Introduction
GameFi (short for Game Finance) merges gaming and decentralized finance (DeFi), creating a new paradigm in the gaming industry. By integrating traditional gameplay mechanics with blockchain technology, GameFi enables players to earn, own, trade, and leverage in-game assets such as tokens, NFTs (non-fungible tokens), and other blockchain-based items. This fusion offers a unique blend of entertainment, digital ownership, and financial incentives.
Overview
GameFi development can vary widely in scope, from simple projects to complex ecosystems. In this tutorial, we'll introduce you to GameFi by building a simple click-counter application. When a user reaches a specific goal, they will receive an NFT, granting them eligibility for future airdrop events.
This guide will walk you through the process of minting your own NFT collection and items by interacting with the TON blockchain via the TONX API. Specifically, you'll learn how to:
- Implement smart contract deployment.
- Deploy an NFT Collection Smart Contract.
- Mint individual NFT items.
Prerequisites
Before starting, ensure you have the following:
- TONX API Account: Sign up for a TONX API account.
- API Key: Obtain an API key from the TONX platform.
Note: The sample code provided is in Node.js and follow the repository of @ton/ton to install the essential module.
Getting Started
Preliminary Information
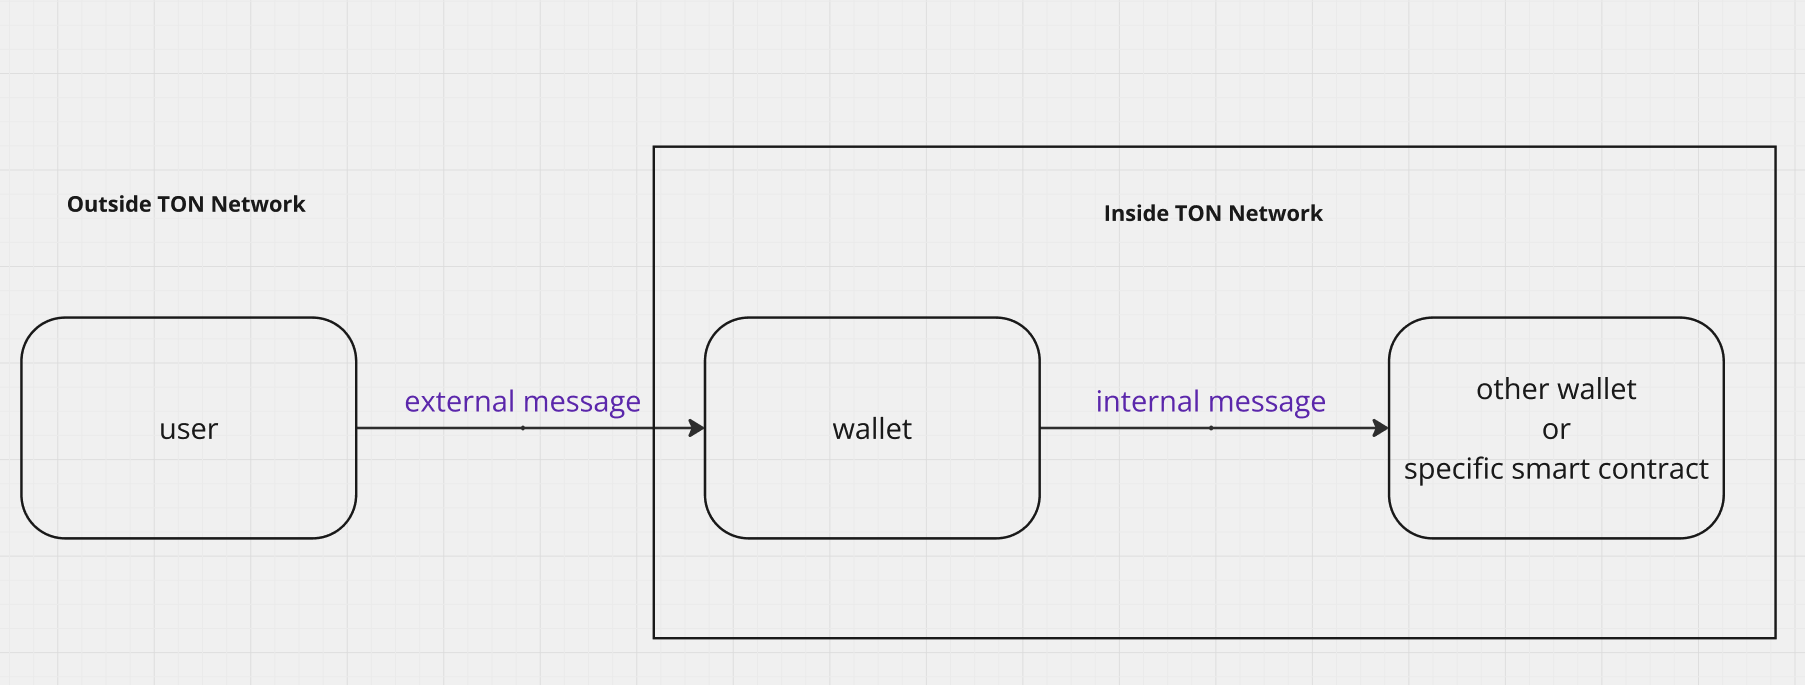
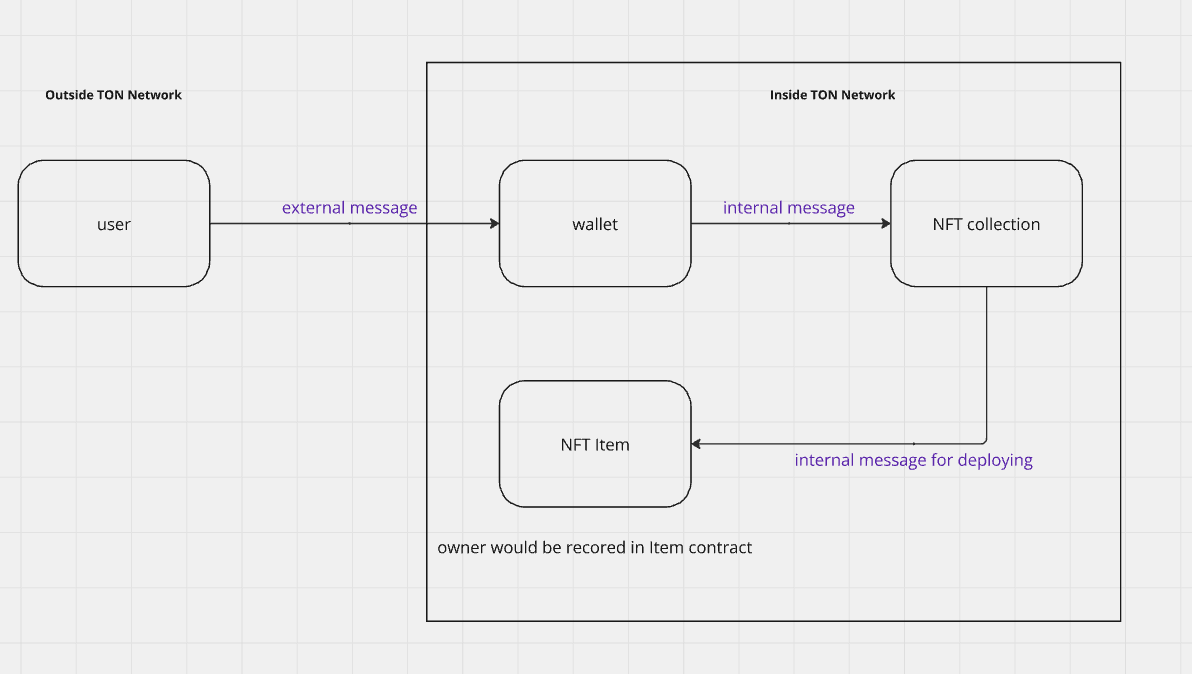
In the blockchain world, every action—whether it's transferring tokens, deploying a smart contract, or executing logic—requires a wallet. On the TON blockchain, data is transmitted through a structure called a message. There are two types of messages: internal messages, used within the TON blockchain network, and external messages, initiated from outside the network. Approximately 90% of events on the TON blockchain are triggered by an external message that sends an internal message to another contract. To learn more about the structure of messages, refer to TON message guidelines.

Sending an External Message
To interact with a wallet or another smart contract on the TON blockchain, you need to initiate an external message. Here’s a sample script to send an external message:.
const mnemonic = "your mnemonic should be here";
const wallet = openWallet(mnemonic.split(" "))
const seqno = await getSeqno(wallet.address.toString())
const walletId = await getSubWalletId(wallet.address.toString())
const internalMsgParams: {
    toAddress: string, //target contract address
    value: string, // "0.05" 0.05TON
    bounce?: boolean, // true
    init?: StateInit, // for deploy contract
    body?: string | Cell // for sending specific internal message
  };
const extMsgBoc = createExtMsgBoc(wallet, internalMsgParams, walletId, seqno);
await sendMessage(exExtBoc);
Get Wallet Information
The mnemonic (secret key) is essential for accessing your wallet. Anyone with your mnemonic has full access to your wallet, so keep it secure. Here’s a function to retrieve wallet data:
export async function openWallet(mnemonic: string[]) {
  const keyPair = await mnemonicToPrivateKey(mnemonic);

  const wallet = WalletContractV4.create({
    workchain: 0,
    publicKey: keyPair.publicKey,
  });

  return { ...wallet, keyPair };
}
Creating an External Message as a BOC
Here’s how to create an external message using the createExtMsgBoc function. For simple transfers, you can omit the init and body fields in internalMsgParams:
export function createExtMsgBoc(
  wallet,
  internalMsgParams:{
    toAddress: string,
    value: string,
    bounce?: boolean,
    init?: StateInit,
    body?: string | Cell
  } ,
  subWalletId: number,
  seqno: number,
  opCode = 0
){
  const { toAddress, value, init, bounce = true, body } = internalMsgParams;
  const intMsg = internal({
    to: Address.parse(toAddress), // Send TON to this address
    value: toNano(value),
    init,
    bounce,
    body,
  });
  const msg = beginCell()
    .storeUint(subWalletId, 32)
    .storeUint(0xFFFFFFFF, 32)
    .storeUint(seqno, 32)
    .storeUint(opCode, 8)
    .storeUint(SendMode.PAY_GAS_SEPARATELY, 8)
    .storeRef(beginCell().store(storeMessageRelaxed(intMsg)));

  const signedMsg = {
    builder: msg,
    cell: msg.endCell()
  }
  const extMsgBody = beginCell()
    .storeBuffer(sign(signedMsg.cell.hash(), wallet.keyPair.secretKey))
    .storeBuilder(signedMsg.builder)
    .endCell();

  const extMsg = external({
    to: wallet.address,
    init: wallet.init,
    body: extMsgBody
  });

  const extMsgCell = beginCell()
    .store(storeMessage(extMsg))
    .endCell();

  return extMsgCell.toBoc().toString('base64')
}
Sending an External Message
The sendMessage function sends an external message to the TON blockchain. The message is formatted as a BOC (Bag of Cells). Here’s how to send an external message:
export async function sendMessage(boc: string){
  const network = 'testnet';
  const version = 'v2';
  const apiKey = 'your api key which is compatible for the network'
  const endpoint = `https://${network}-rpc.tonxapi.com/${version}/json-rpc/${apiKey}`
  const method = "sendMessage"
  const id = "1"
  const jsonprc = "2.0"

  const response = await fetch(endpoint, {
    method: 'POST',
    headers: {
      'Content-Type': 'application/json',
    },
    body: JSON.stringify({
      id,
      jsonrpc,
      method,
      params: {
        boc,
      }
    })
  })
  const data = await response.json()

  return data.result;
}
Retrieve Sub Wallet ID
This function retrieves the wallet ID using the runGetMethod. It is a crucial parameter for validating transactions on the wallet contract:.
export async function getSubWalletId(walletAddress: string){
  const network = 'testnet';
  const version = 'v2';
  const apiKey = 'your api key which is compatible for the network'
  const endpoint = `https://${network}-rpc.tonxapi.com/${version}/json-rpc/${apiKey}`
  const runGetMethod = "runGetMethod"
  const method = "get_subwallet_id"
  const id = "1"
  const jsonprc = "2.0"

  const response = await fetch(endpoint, {
    method: 'POST',
    headers: {
      'Content-Type': 'application/json',
    },
    body: JSON.stringify({
      id,
      jsonrpc,
      method: runGetMethod,
      params: {
        address: walletAddress,
        method,
        stack:[]
      }
    })
  })
  const data = await response.json()
  const subWalletIdHex = data.result.result.stack[0][1];
  const subWalletId = parseInt(subWalletIdHex, 16);
  return subWalletId;
}
Retrieve Wallet Sequential Number
The sequential number is a serial ID for each transaction in the wallet contract. It ensures that transactions are processed in order:
export async function getSeqno(walletAddress: string){
  const network = 'testnet';
  const version = 'v2';
  const apiKey = 'your api key which is compatible for the network'
  const endpoint = `https://${network}-rpc.tonxapi.com/${version}/json-rpc/${apiKey}`
  const runGetMethod = "runGetMethod"
  const method = "seqno"
  const id = "1"
  const jsonprc = "2.0"

  const response = await fetch(endpoint, {
    method: 'POST',
    headers: {
      'Content-Type': 'application/json',
    },
    body: JSON.stringify({
      id,
      jsonrpc,
      method: runGetMethod,
      params: {
        address: walletAddress,
        method,
        stack:[]
      }
    })
  })
  const data = await response.json()
  const seqnoHex = data.result.result.stack[0][1];
  const seqno = parseInt(seqnoHex, 16);
  return seqno;
}
Deploy NFT Collection Smart Contract and Mint NFT Item.
In this section, we will deploy an NFT collection smart contract and mint an NFT item. Before starting, it is essential to understand how to build a BOC (Bag of Cells) for deploying a smart contract. We will use an NFT collection smart contract as an example.
Deploying the Collection Contract
To deploy the collection contract, follow these steps:
- Set Up the External Message
This script sends an external message to deploy the NFT collection contract:
const mnemonic = "your mnemonic should be here";
const wallet = openWallet(mnemonic.split(" "))
const nftCollectionAddress = contractAddress(0, nftCollectionStateInit)
const seqno = await getSeqno(wallet.address.toString())
const walletId = await getSubWalletId(wallet.address.toString())
const value = "0.05"; //0.05 TON
const extMsgBoc = createExtMsgBoc(
                wallet,
                {
                  toAddress: nftCollectionAddress,
                  value,
                  init: nftCollectionStateInit,
                },
                walletId,
                seqno
              );
await sendMessage(exExtBoc);
- Prepare Collection Metadata and Build the BOC
The stateInit parameter is crucial for deploying the contract, and it is assembled using data and code.
- Data:
Contains custom information such asownerAddress,royaltyPercent,nextItemIndex,collectionContentUrl, andcommonContentUrl. Learn more about NFT collection metadata from Deploying NFT Collection. - Code:
The compiled smart contract code in FunC or Tact. You can find relevant contracts in the Blueprint or Getgems. Compile it using blueprint for deployment.
Example function to create the data cell:
  function createDataCell(params:{
   address: string,

  }): Cell {
    const data = {
	    ownerAddress: Address.parse(address),
	    royaltyPercent: 0.05, // 0.05 = 5%
	    royaltyAddress: Address.parse(address),
	    nextItemIndex: 40405,
	    collectionContentUrl: `https://your.storage-server.domain/collection.json`,
	    commonContentUrl: `https://your.storage-server.domain/`,
	  };
    const itemCodeBase64 = "te6cckECDQEAAdAAART/APSkE/S88sgLAQIBYgMCAAmhH5/gBQICzgcEAgEgBgUAHQDyMs/WM8WAc8WzMntVIAA7O1E0NM/+kAg10nCAJp/AfpA1DAQJBAj4DBwWW1tgAgEgCQgAET6RDBwuvLhTYALXDIhxwCSXwPg0NMDAXGwkl8D4PpA+kAx+gAxcdch+gAx+gAw8AIEs44UMGwiNFIyxwXy4ZUB+kDUMBAj8APgBtMf0z+CEF/MPRRSMLqOhzIQN14yQBPgMDQ0NTWCEC/LJqISuuMCXwSED/LwgCwoAcnCCEIt3FzUFyMv/UATPFhAkgEBwgBDIywVQB88WUAX6AhXLahLLH8s/Im6zlFjPFwGRMuIByQH7AAH2UTXHBfLhkfpAIfAB+kDSADH6AIIK+vCAG6EhlFMVoKHeItcLAcMAIJIGoZE24iDC//LhkiGOPoIQBRONkchQCc8WUAvPFnEkSRRURqBwgBDIywVQB88WUAX6AhXLahLLH8s/Im6zlFjPFwGRMuIByQH7ABBHlBAqN1viDACCAo41JvABghDVMnbbEDdEAG1xcIAQyMsFUAfPFlAF+gIVy2oSyx/LPyJus5RYzxcBkTLiAckB+wCTMDI04lUC8ANqhGIu"
    const collectionCodebase64 = "te6cckECFAEAAh8AART/APSkE/S88sgLAQIBYgkCAgEgBAMAJbyC32omh9IGmf6mpqGC3oahgsQCASAIBQIBIAcGAC209H2omh9IGmf6mpqGAovgngCOAD4AsAAvtdr9qJofSBpn+pqahg2IOhph+mH/SAYQAEO4tdMe1E0PpA0z/U1NQwECRfBNDUMdQw0HHIywcBzxbMyYAgLNDwoCASAMCwA9Ra8ARwIfAFd4AYyMsFWM8WUAT6AhPLaxLMzMlx+wCAIBIA4NABs+QB0yMsCEsoHy//J0IAAtAHIyz/4KM8WyXAgyMsBE/QA9ADLAMmAE59EGOASK3wAOhpgYC42Eit8H0gGADpj+mf9qJofSBpn+pqahhBCDSenKgpQF1HFBuvgoDoQQhUZYBWuEAIZGWCqALnixJ9AQpltQnlj+WfgOeLZMAgfYBwGyi544L5cMiS4ADxgRLgAXGBEuAB8YEYGYHgAkExIREAA8jhXU1DAQNEEwyFAFzxYTyz/MzMzJ7VTgXwSED/LwACwyNAH6QDBBRMhQBc8WE8s/zMzMye1UAKY1cAPUMI43gED0lm+lII4pBqQggQD6vpPywY/egQGTIaBTJbvy9AL6ANQwIlRLMPAGI7qTAqQC3gSSbCHis+YwMlBEQxPIUAXPFhPLP8zMzMntVABgNQLTP1MTu/LhklMTugH6ANQwKBA0WfAGjhIBpENDyFAFzxYTyz/MzMzJ7VSSXwXiN0CayQ=="
    const dataCell = new Builder();
    dataCell.storeAddress(data.ownerAddress);
    dataCell.storeUint(data.nextItemIndex, 64);

    const contentCell = new Builder();

    const collectionContent = encodeOffChainContent(data.collectionContentUrl);

    const commonContent = new Builder();
    commonContent.storeBuffer(Buffer.from(data.commonContentUrl));

    contentCell.storeRef(collectionContent);
    contentCell.storeRef(commonContent);

    dataCell.storeRef(contentCell);
    const nftItemCodeCell = Cell.fromBase64(itemCodeBase64);
    dataCell.storeRef(nftItemCodeCell);

    const royaltyCell = new Builder();
    const royaltyBase = 1000;
    const royaltyFactor = Math.floor(data.royaltyPercent * royaltyBase);
    royaltyCell.storeUint(royaltyFactor, 16);
    royaltyCell.storeUint(royaltyBase, 16);
    royaltyCell.storeAddress(data.royaltyAddress);

    dataCell.storeRef(royaltyCell);
    return dataCell.endCell();
  }

  const nftCollectionStateInit: StateInit = {
	  data: createDataCell(),
	  code: Cell.fromBase64(collectionCodebase64),
  }
You can understand more about encoding off-chain content from TON Docs.
Prepare MintBody and Deploy NFT Item
After deploying the collection, mint an NFT item by sending an internal message to the NFT collection contract. This will trigger the deployment of the NFT item contract.

Follow the tutorial from Deploy NFT Items and use the following script to mint your first NFT:
 const queryId = generateRandomInRange(1, 9007199254740991);

  const mintParams = {
    queryId,
    itemOwnerAddress: Address("your wallet address"),
    itemIndex,
    amount: toNano("0.05"),
    commonContentUrl: 'theMetaDataFileName.json',
  } as mintParams;

  public createMintBody(params: mintParams): Cell {
    const msgBody = new Builder();
    msgBody.storeUint(OperationCodes.Mint, 32);
    msgBody.storeUint(params.queryId || 0, 64);
    msgBody.storeUint(params.itemIndex, 64);
    msgBody.storeCoins(params.amount);

    const itemContent = new Builder();
    itemContent.storeBuffer(Buffer.from(params.commonContentUrl));

    const nftItemMessage = new Builder();
    nftItemMessage.storeAddress(params.itemOwnerAddress);
    nftItemMessage.storeRef(itemContent);

    msgBody.storeRef(nftItemMessage);
    return msgBody.endCell();
  }

const value = "0.5" //0.05 TON
const mnemonic = "your mnemonic should be here";
const wallet = openWallet(mnemonic.split(" "))
const toAddress = contractAddress(0, stateInit)
const seqno = await getSeqno(wallet.address.toString())
const walletId = await getSubWalletId(wallet.address.toString())
const extMsgBoc = createExtMsgBoc(
                    wallet,
                    {
                      toAddress: nftCollectionAddress,
                      value,
                      body: createMintBody(mintParams),
                    },
                    walletId,
                    seqno
                  );
await sendMessage(exExtBoc);
Deploy Jetton Minter Contract And Mint Jetton.
To deploy a Jetton minter contract and mint Jettons, follow the instructions in the Deploy Smart Contracts tutorial.
Conclusion
You've successfully built your first DeFi application by deploying smart contracts, retrieving balances, and managing deposits and withdrawals. This foundation empowers you to create innovative DeFi solutions that maximize user engagement and streamline financial operations.
Ready to take on more challenges? Explore our Build Your First DeFi App guide to learn how to combine gaming and DeFi by creating engaging blockchain-based gaming experiences. Start building the future of gaming with TONX API today!
